> ## Documentation Index
> Fetch the complete documentation index at: https://docs.florists.digital/llms.txt
> Use this file to discover all available pages before exploring further.
# Creating Event Orders
> Turn your quotation items into orders for production and delivery.
**Event orders are how you turn an accepted quotation into real work for your team.** Once your client has said yes to the proposal, you create orders from the quotation items so your team knows exactly what to prepare and where to deliver it. It's the bridge between planning and production.
Orders created here stay linked to their parent event and don't use the everyday-order allowance. Use **Create Order** for everyday orders instead.
 ## When to create event orders
You'll typically create orders after the proposal has been accepted and you're ready to schedule production. There's no rush — you can wait until closer to the event date when final details are confirmed. The important thing is that your quotation is complete and accurate before you turn it into orders.
## The order creation workflow
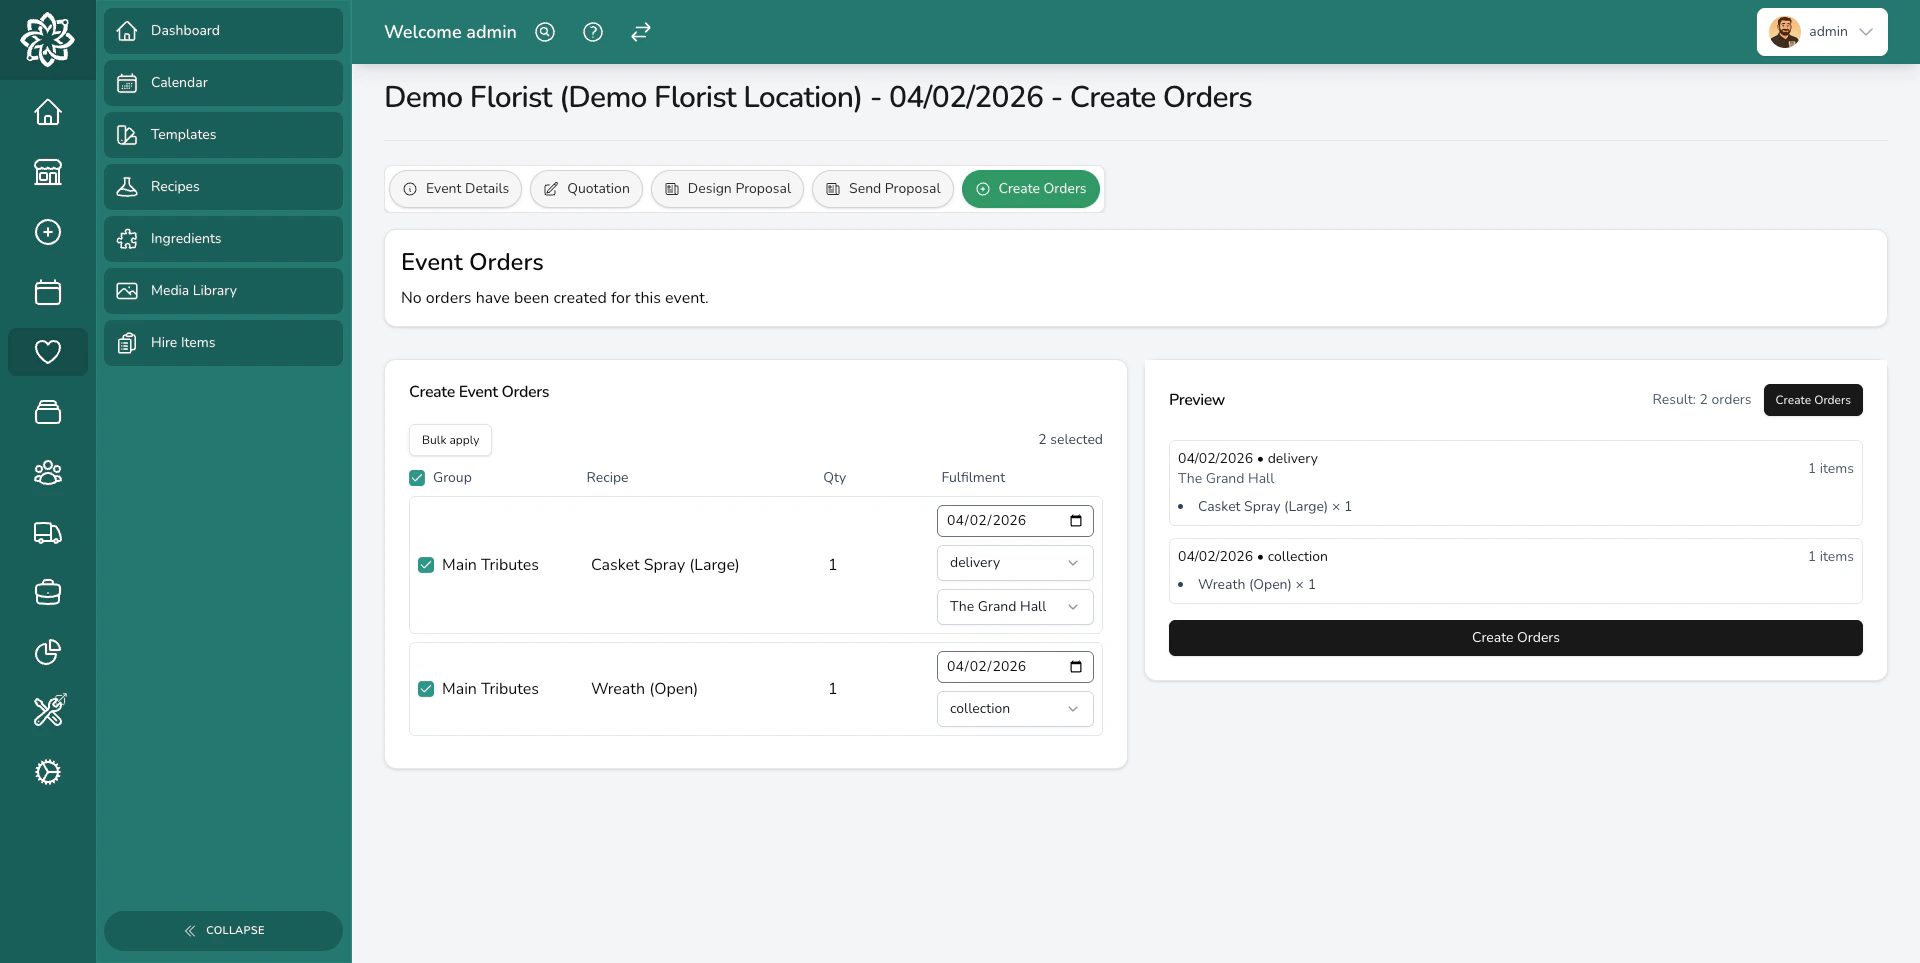
Navigate to your event and select the **Create Orders** tab. The tab is renamed to **Orders** once at least one event order exists.
All items from the quotation are pulled in automatically. The names, quantities, and details carry over, so you don't need to re-enter anything.
Each item starts with the event date as the fulfilment date and **Collection** as the method. Adjust either at the group level when you need to.
If you've already created orders that match a recipe and quantity, those items show an **On order** badge. They're hidden by default and can be shown again from the filter banner.
Select items and use **Move to new order** or **Move to existing** to group them. Each draft order becomes one real order when you create.
For each draft, set the **fulfilment date**, choose **Collection** or **Delivery**, and pick a **venue** when it's a delivery. The venue list comes from the venues added to the event.
When everything looks right, click **Create Orders**. One order is created per unique combination of date, method, and venue.
## When to create event orders
You'll typically create orders after the proposal has been accepted and you're ready to schedule production. There's no rush — you can wait until closer to the event date when final details are confirmed. The important thing is that your quotation is complete and accurate before you turn it into orders.
## The order creation workflow
Navigate to your event and select the **Create Orders** tab. The tab is renamed to **Orders** once at least one event order exists.
All items from the quotation are pulled in automatically. The names, quantities, and details carry over, so you don't need to re-enter anything.
Each item starts with the event date as the fulfilment date and **Collection** as the method. Adjust either at the group level when you need to.
If you've already created orders that match a recipe and quantity, those items show an **On order** badge. They're hidden by default and can be shown again from the filter banner.
Select items and use **Move to new order** or **Move to existing** to group them. Each draft order becomes one real order when you create.
For each draft, set the **fulfilment date**, choose **Collection** or **Delivery**, and pick a **venue** when it's a delivery. The venue list comes from the venues added to the event.
When everything looks right, click **Create Orders**. One order is created per unique combination of date, method, and venue.
 ## Organising items into draft orders
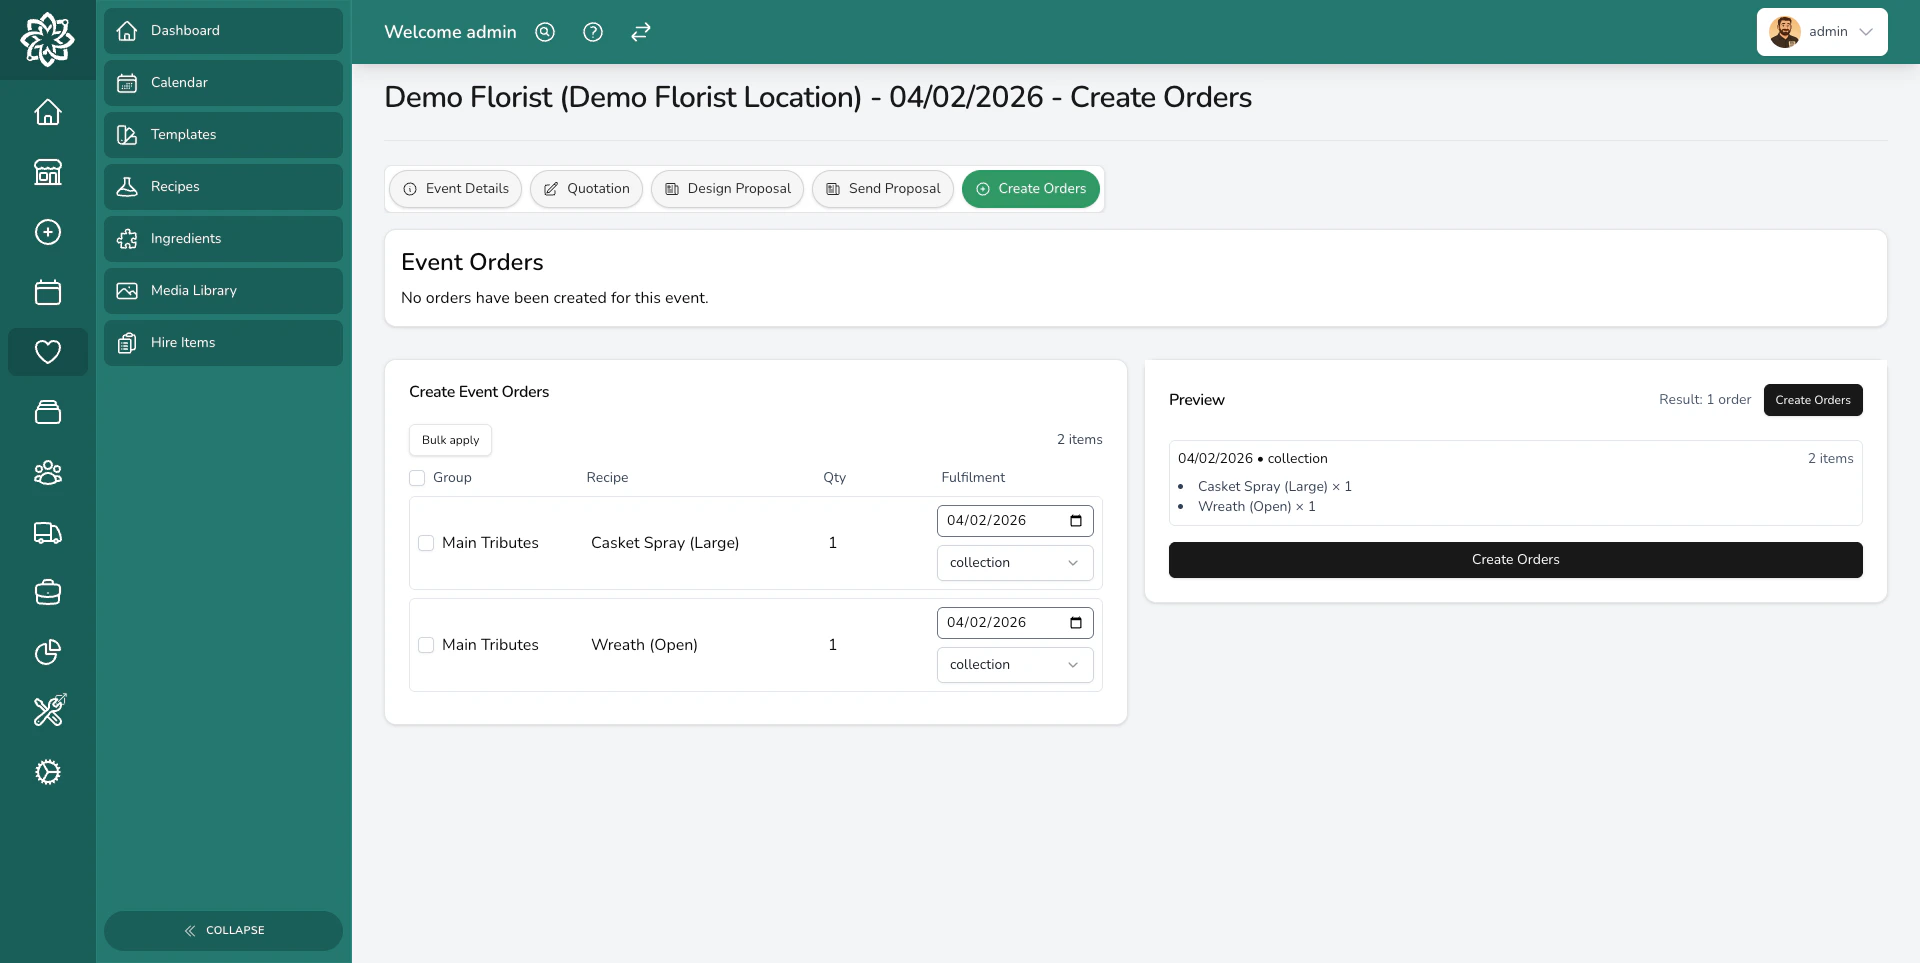
Not everything for an event goes to the same place at the same time. A bride might collect her bouquet from the shop on Saturday morning, while table centres need delivering to the venue on Friday afternoon. Draft orders let you split items by where and when they're needed.
Here's how grouping works:
* **Each draft order becomes one real order.** Items in the same draft must share the same fulfilment date, method, and venue.
* **Split quantities across drafts.** If the client ordered 12 table centres but 6 go to the ceremony and 6 to the reception at a different venue, use **Split** on the row, then move the new rows into a separate draft.
* **Move items between drafts** by selecting them and using **Move to new order** or **Move to existing**. There's no drag-and-drop.
* **Create new drafts** whenever you need a different date, method, or venue.
Review your items carefully before creating orders. It's quicker to adjust drafts, quantities, and fulfilment details on this screen than to modify individual orders afterwards.
## What happens when you create orders
Once you click **Create Orders**, several things happen:
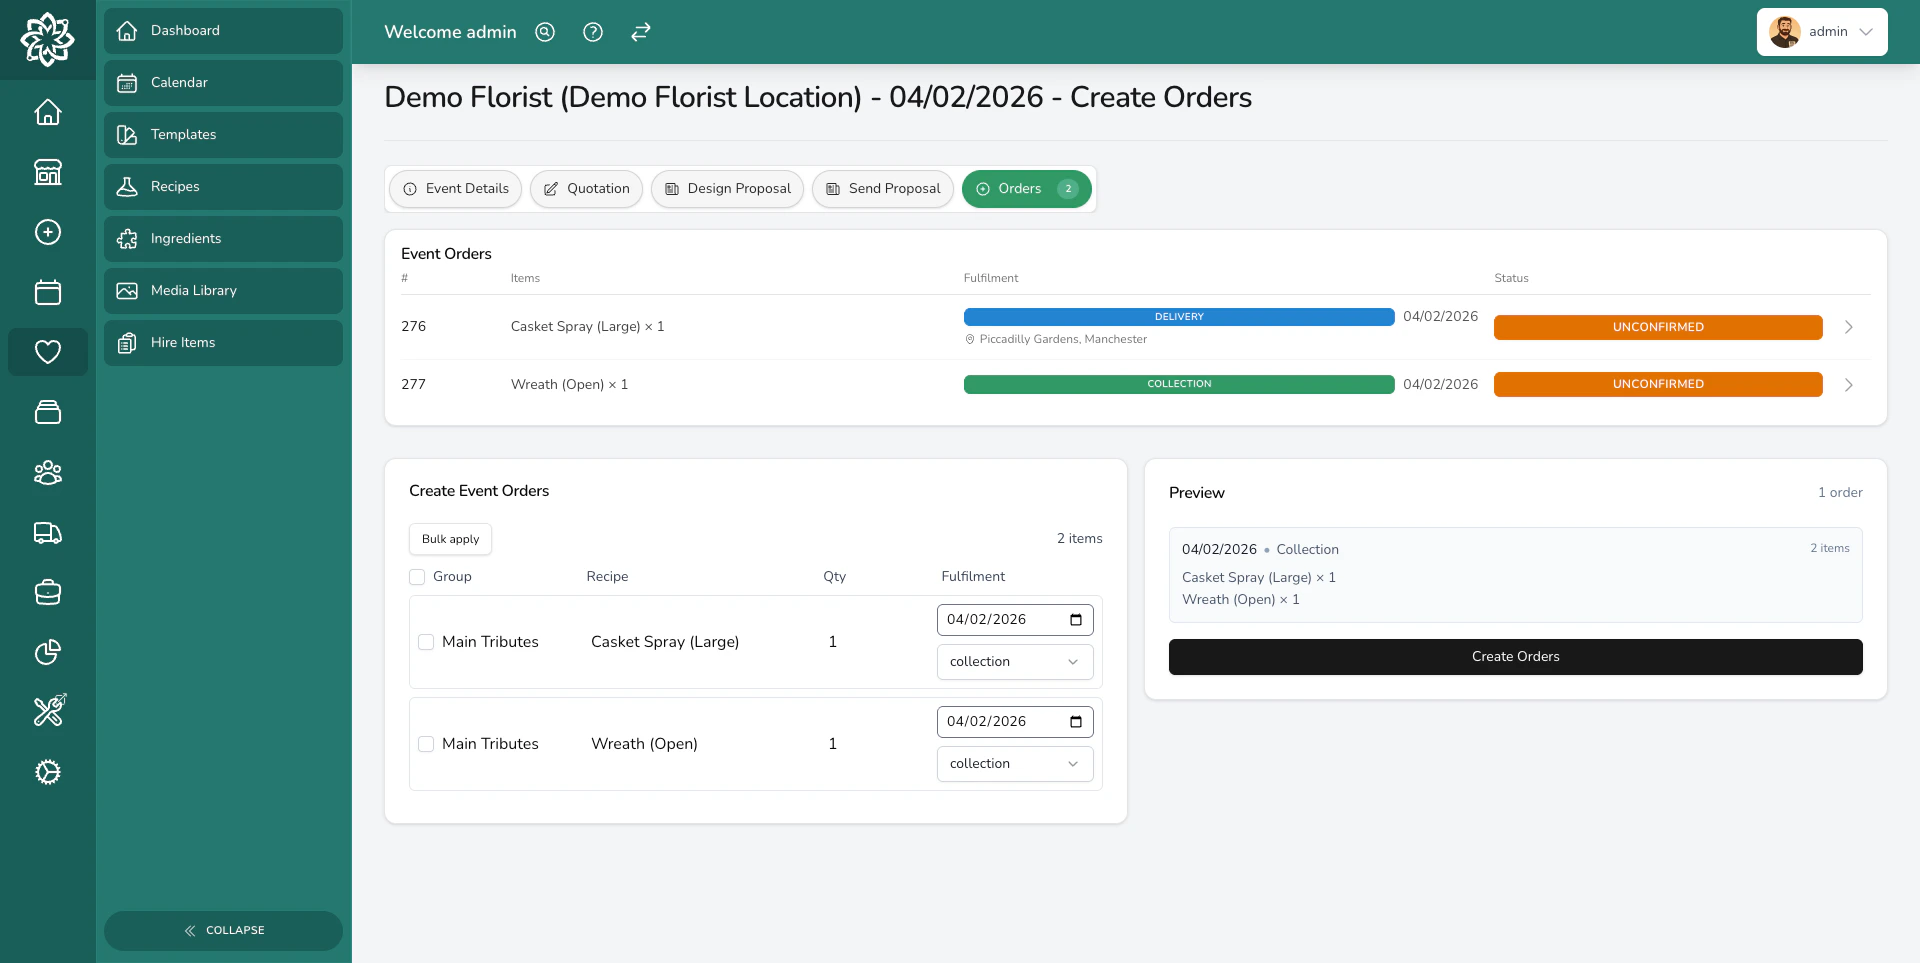
* **One order is created per draft.** Each unique combination of date, method, and venue becomes its own order.
* **Orders start as Unconfirmed** so you can review them before committing to production.
* **The event status moves to Order Created**, so you can see at a glance that production has been scheduled.
* **Orders appear on your dashboard** alongside your regular daily orders. Your team prepares them as part of their normal workflow.
## Organising items into draft orders
Not everything for an event goes to the same place at the same time. A bride might collect her bouquet from the shop on Saturday morning, while table centres need delivering to the venue on Friday afternoon. Draft orders let you split items by where and when they're needed.
Here's how grouping works:
* **Each draft order becomes one real order.** Items in the same draft must share the same fulfilment date, method, and venue.
* **Split quantities across drafts.** If the client ordered 12 table centres but 6 go to the ceremony and 6 to the reception at a different venue, use **Split** on the row, then move the new rows into a separate draft.
* **Move items between drafts** by selecting them and using **Move to new order** or **Move to existing**. There's no drag-and-drop.
* **Create new drafts** whenever you need a different date, method, or venue.
Review your items carefully before creating orders. It's quicker to adjust drafts, quantities, and fulfilment details on this screen than to modify individual orders afterwards.
## What happens when you create orders
Once you click **Create Orders**, several things happen:
* **One order is created per draft.** Each unique combination of date, method, and venue becomes its own order.
* **Orders start as Unconfirmed** so you can review them before committing to production.
* **The event status moves to Order Created**, so you can see at a glance that production has been scheduled.
* **Orders appear on your dashboard** alongside your regular daily orders. Your team prepares them as part of their normal workflow.
 ## Adding orders later
Plans change. The client might add extra buttonholes a week before the wedding, or decide they need flowers for the rehearsal dinner too. Come back to the Orders tab at any time and create additional orders for new items.
Items already on existing orders show an **On order** badge and are hidden by default, so you're only working with what's new. Use the filter banner to show them again if you need to re-order something.
Double-check that the venue on each draft matches the right address before creating orders. A wrong venue means your team could deliver to the wrong location on the day.
## Common questions
Yes. Orders start as Unconfirmed, so you can open them and make changes before your team begins production. Once an order is confirmed, changes are more limited.
Use **Split** on the row to break the quantity, then move the new rows into a separate draft. For example, if a client ordered 10 centrepieces, you can split into 6 and 4, then put each draft on a different date or venue.
Yes. Event orders appear on your dashboard and in your daily order list alongside walk-in and online orders. Your team handles them the same way as any other order.
Yes. If something isn't right, delete the order and return to the Create Orders screen. Items from deleted orders won't show the **On order** badge, so they'll be available to add to new orders.
## What's next?
See how events move through each status from draft to completed.
Build itemised quotes with recipe-based pricing.
Manage your daily orders, including event orders.
Plan routes and track deliveries for all your orders.
## Adding orders later
Plans change. The client might add extra buttonholes a week before the wedding, or decide they need flowers for the rehearsal dinner too. Come back to the Orders tab at any time and create additional orders for new items.
Items already on existing orders show an **On order** badge and are hidden by default, so you're only working with what's new. Use the filter banner to show them again if you need to re-order something.
Double-check that the venue on each draft matches the right address before creating orders. A wrong venue means your team could deliver to the wrong location on the day.
## Common questions
Yes. Orders start as Unconfirmed, so you can open them and make changes before your team begins production. Once an order is confirmed, changes are more limited.
Use **Split** on the row to break the quantity, then move the new rows into a separate draft. For example, if a client ordered 10 centrepieces, you can split into 6 and 4, then put each draft on a different date or venue.
Yes. Event orders appear on your dashboard and in your daily order list alongside walk-in and online orders. Your team handles them the same way as any other order.
Yes. If something isn't right, delete the order and return to the Create Orders screen. Items from deleted orders won't show the **On order** badge, so they'll be available to add to new orders.
## What's next?
See how events move through each status from draft to completed.
Build itemised quotes with recipe-based pricing.
Manage your daily orders, including event orders.
Plan routes and track deliveries for all your orders.