See everything that needs your attention today, all in one place.
Your Dashboard is where you start each day. It shows today’s orders, upcoming deliveries, things that need your attention, and your team’s tasks, all in one place.
A two-minute check each morning keeps everything running smoothly.
1
Check your alerts
Look at the top of your dashboard. Any red or amber alert cards? Deal with them first — unfulfilled orders from yesterday or unpaid orders need attention. Failed repeat orders or integration failures are rare backup alerts, but action them if they appear.
2
Confirm new orders
Check the Unconfirmed Orders section (highlighted in green). These came in overnight from your website or relay networks. Review each one — orders from your website may carry a red note sticker flagging important information you need to check before confirming.
3
Review today's orders
Click Today above the orders table and scan through your list. Watch for special requests or funeral orders that need priority.
4
Open your pick list
If you use product recipes, open your digital worksheet on the dashboard or in the app to see what stems and materials you need. Pick stock from the cooler ready to be made up.
5
Glance at tomorrow
Click Tomorrow to see what’s coming. This gives you time to order stock or adjust staffing if tomorrow is busier than expected.
If something needs your attention, the dashboard surfaces it at the top of the screen, above your orders.
Don’t ignore these — they need action:
Unfulfilled Orders — orders from past days that haven’t been marked as fulfilled. Today’s unfulfilled orders aren’t here yet. Check whether they were delivered or collected and update them.
Failed Repeat Orders — a recurring order didn’t generate. Rare, but open it to see what went wrong.
Integration Failures — an order didn’t send to a relay network (Direct2Florist, eFlorist, etc.). Rare, but you may need to resend it manually.
Worth reviewing:
Unpaid Orders — fulfilled orders that still haven’t been paid in full. Pre-fulfilment unpaid orders aren’t surfaced here.
Overdue Events — past events that haven’t been closed or reconciled.
Overdue Tasks — tasks past their due date that haven’t been completed.
Orders from your website can arrive with a red note sticker flagging important information you need to review before confirming. Check the note first — the onus is on you to action it. Examples include:
The delivery address is outside your usual area, so you may need to put it through relay
A mismatch between products that needs clarifying
A customer note added when placing the order
Unpaid orders alert showing orders that still need payment
Above the orders table, you’ll see date chips: Today, Tomorrow, the next weekday, Other, and All Dates. Click Other to open a calendar showing order counts on each day — dates with scheduled events show a small heart icon, so you can see weddings and event days at a glance.
When you pick a date in the past, an amber banner appears reminding you that you’re viewing old orders. This is your cue to be careful — actions you take here apply to historical orders.
When today’s date has scheduled events, a rose-coloured Event Highlights banner appears above your orders, deep-linking straight to each event’s details.
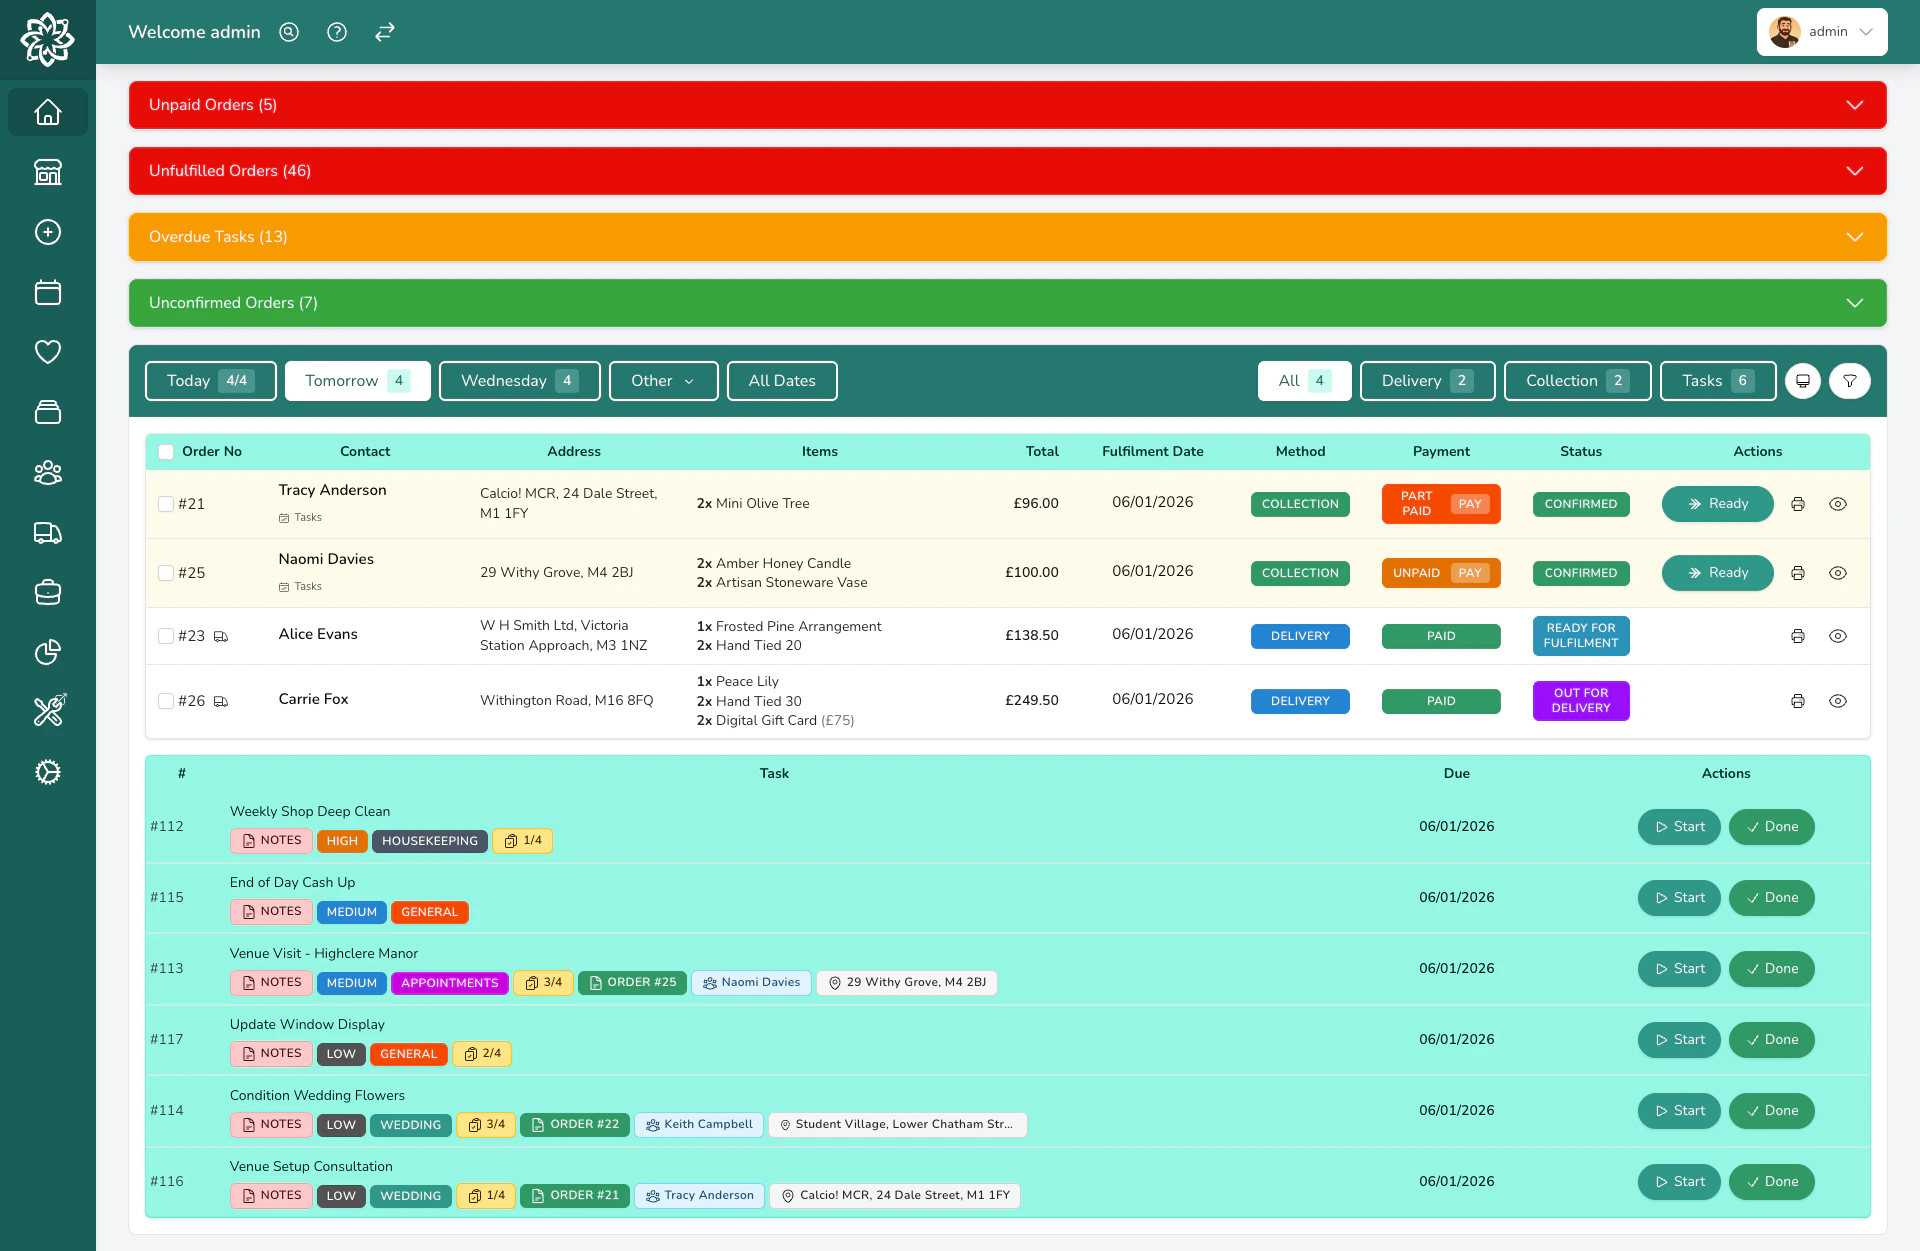
The main section of your dashboard shows your orders for the selected date. Use the tabs at the top of the orders table to filter:
All — every order for the day, plus tasks in the same date range
Delivery — orders going out for delivery (including courier orders)
Collection — orders being picked up in-store
Tasks — your team’s task list
Each tab shows a count badge so you can see at a glance how many items are in each view.
Your orders list with filtering tabs
If your shop has more than one location, an extra Location column appears on the orders table when you’re viewing All Locations. Switch to a specific location from the header selector to hide it.
Click the filter icon to narrow down what you see. You can filter by:
Order Status — Unconfirmed, Confirmed, Ready, Out for Delivery, Fulfilled, and more
Assigned To — only orders assigned to you or a specific team member
Order Type — Gift, Funeral, Event, Corporate
Delivery Slot — AM or PM deliveries
Product Name — search for orders containing a specific product
Not Printed — show only orders you haven’t printed yet
Integration — filter by where the order came from
A badge appears on the filter icon showing how many filters are active. Filters are personal to each team member — your view doesn’t change anyone else’s. Click Clear to remove all filters.
By default, your dashboard uses Curated sorting, which puts the most urgent work first:
Funeral orders with specific times — these can’t be late
AM deliveries that need to go out first
Standard deliveries sorted by time
Collections for customers picking up in-store
You can change this in Settings > General > Operations > Dashboard Sort Mode. Options include By Latest, By Oldest, By Fulfilment Date (Newest First), By Fulfilment Date (Oldest First), and By Fulfilment Time.You can also click the Order No, Total, or Date column headers to sort the current view ascending or descending.
When new orders come in (from your website or a relay network), they appear in the Unconfirmed Orders section at the top with a green highlight. You need to confirm them before they move to your main order list.To confirm a single order, click on it and change its status. To confirm several at once, tick the checkboxes and use the Confirm button in the toolbar, or Confirm & Send to Courier to confirm and book courier collection in one step.
The Confirm button can grey out for specific orders, for example a Send-to-a-Friend order or a relay-network order. The button’s tooltip tells you why.
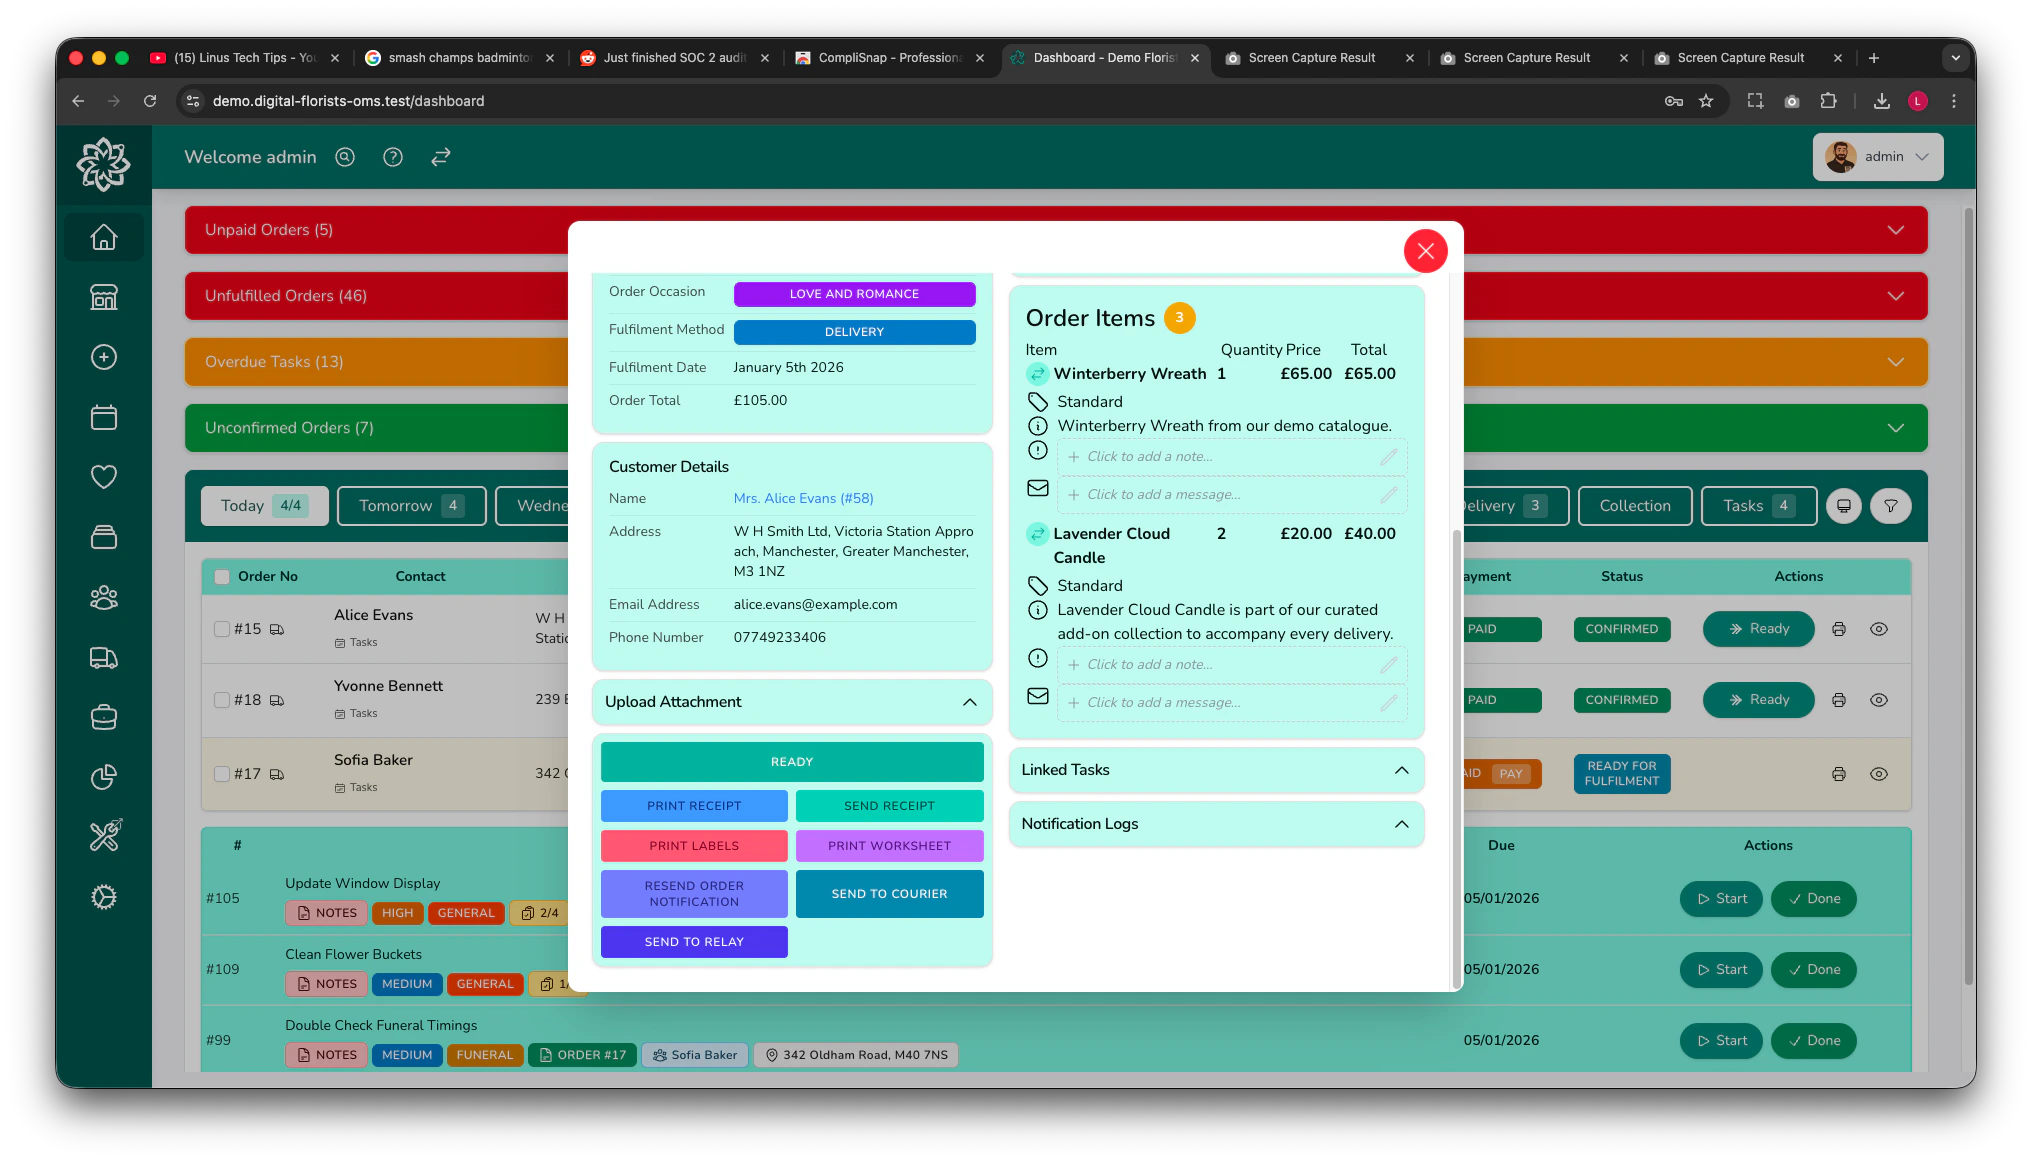
Click any order to open its digital worksheet. From there you can:
View the customer’s name, address, card message, and any special notes
Edit the customer message and add notes to a product
Change the status through Confirmed, Ready, Out for Delivery, Fulfilled
Print a worksheet, label, or order card
Assign the order to a team member
To edit the delivery address or order contents, click the eye icon on the right-hand side (or use View Order) to open the full order edit screen.You can confirm an order and mark it as ready or collected using the buttons directly on the dashboard, the button panel on the digital worksheet, or from inside the edit order screen.
Marking a delivery order as fulfilled from the dashboard or worksheet still sends the customer’s delivery notification, but it doesn’t capture a proof-of-delivery photo or GPS location. The driver app captures both when the driver marks the stop delivered, which is the usual route for deliveries.
For everything you can do from the order edit screen, see Managing Orders.
During busy periods, work with multiple orders at once. Tick the checkboxes next to the orders you want, then use the toolbar that appears:
Confirm — accept multiple new orders at once
Ready — mark several orders as ready
With Courier — move ready courier orders to “with courier” status
Send to Courier — book courier collection for eligible orders
Assign — assign a batch of orders to a team member
Print — print worksheets or labels for all selected orders
Bulk Fulfilled is available for Collection orders (from Ready) and Relay orders (from Confirmed). Delivery orders can’t be marked fulfilled in bulk from the dashboard. Mark each delivery from its worksheet, or let the driver app handle it on the run.
Use the Select All checkbox in the table header to quickly select every order in the current view. Combined with filters (e.g. Not Printed), it’s the fastest way to catch up after a rush of new orders.
Print directly from the dashboard. Choose between:
Worksheets — detailed sheets showing the recipe, card message, and delivery details
Labels — smaller labels to attach to arrangements
Bulk (Slim) — a compact PDF for all selected orders (falls back to the current date + filters if nothing is selected)
Your default print format (Worksheets or Labels) is set in Settings > General > Delivery Slots > Fulfilment Printable Format. The Print button uses your default; the dropdown beside it offers the alternative format.
If you use worksheets with integrated labels, choose the worksheet layout that matches your label sheets in Settings > General > Personalisation. Most shops use the default; print a test order before running a batch. You can adjust the font and font size in the same section.
There can be slight differences between label sheet brands, so testing is normal. If the default layout doesn’t line up, try one of the alternatives.
By default, orders that have been delivered or collected disappear from the dashboard, so the board clears down by the end of the day. If you need to see completed orders (to check a delivery or reprint a label), open the Other date popover and toggle Include fulfilled orders today. This toggle is only available when you’re viewing today’s date.
The Displays button (computer-monitor icon above the orders table) opens a menu of alternative views: Order Board, Production, and Shopping List. Use whichever fits the moment.
The Order Board is a live wall display for a TV in your workroom, styled after the order screens in restaurant kitchens: a status rail with counts for every stage, big make-up tickets for orders still to prepare, and a compact strip for orders that are ready, out, or fulfilled. It’s designed to be read from across the room and left alone — see the dedicated Order Board page for what’s on screen and how to set up the TV.
The Order Board works brilliantly with the Digital Florists App. Put the board on a screen in your workshop, and as your florists mark orders as ready on their phones, the board updates in real time. It’s the easiest way to go paperless during peaks.
The Production view aggregates everything you need to make today. It adds up the products across your confirmed orders, showing totals like “12 x Standard Hand-Tied” plus unit price and total revenue per product line. Tasks aren’t included.Toggle Include Ready Orders to count orders already marked as ready, and Show Modifications to see any special requests with their order numbers.
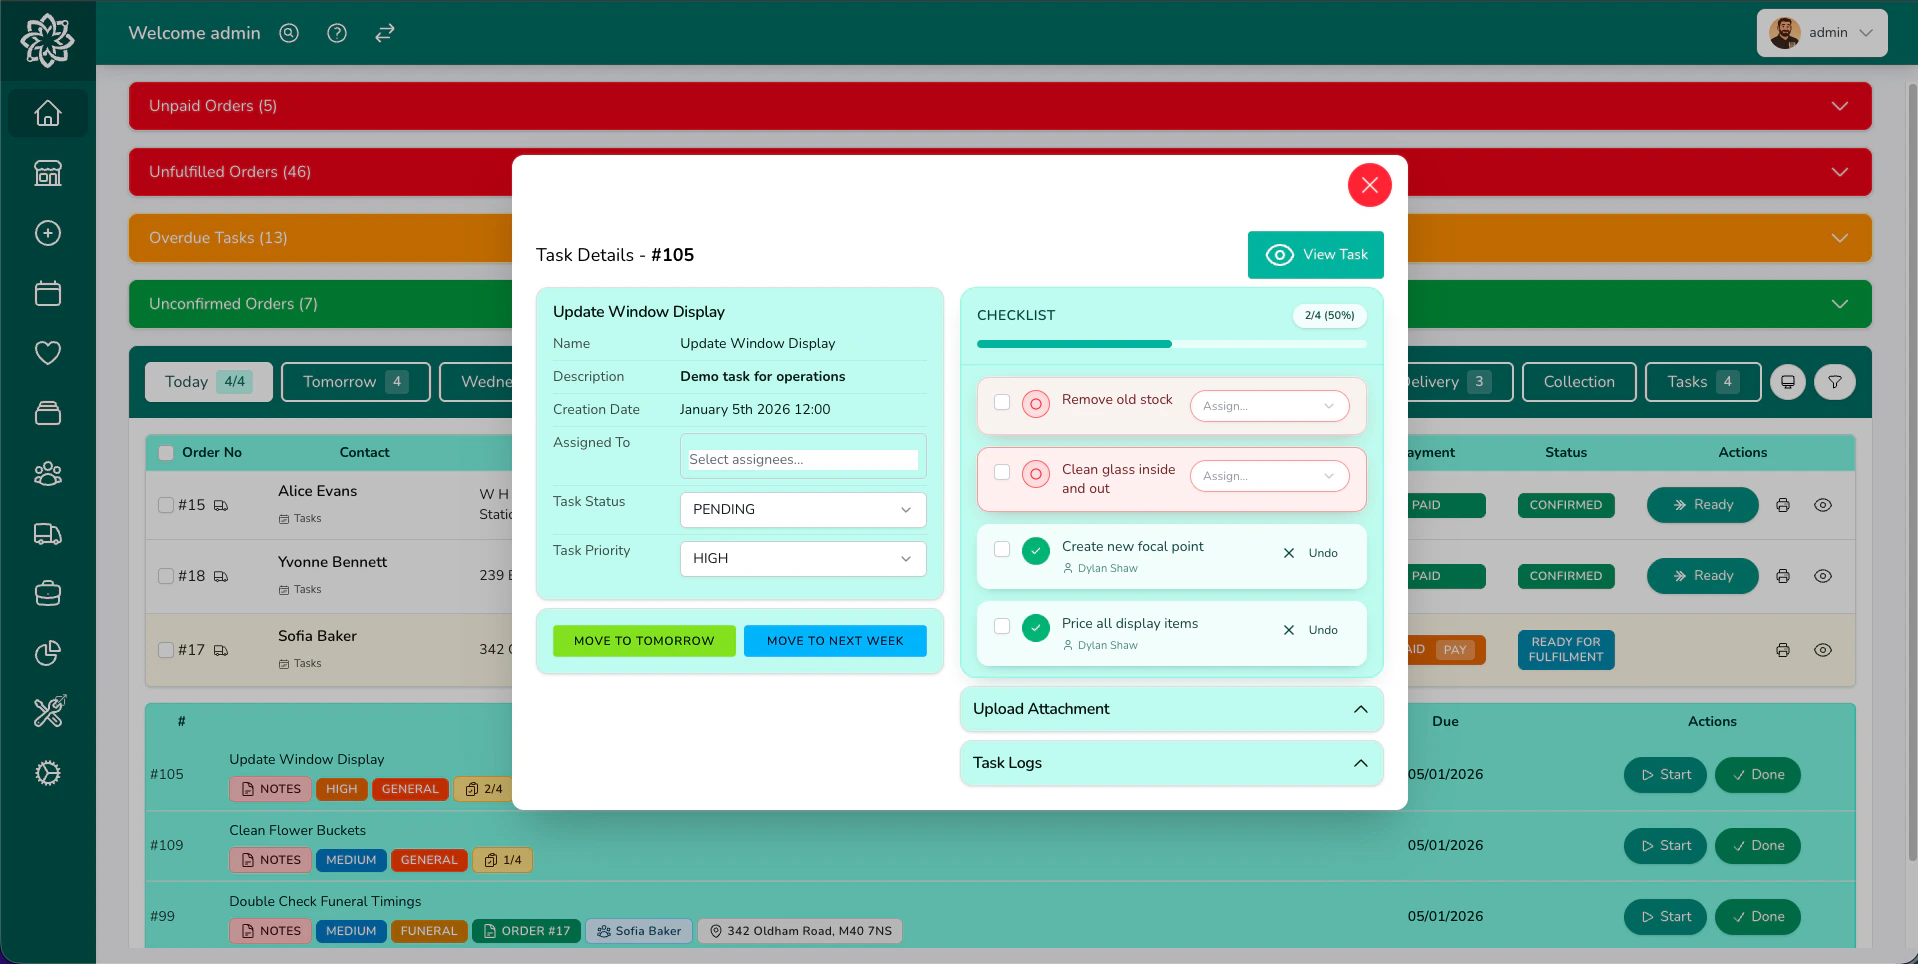
Tasks show up in two places. On the All tab, they appear in a separate section below the orders table for the same date range. On the Tasks tab they’re the primary list. Both views let you filter by assignee, priority, category, and status.
Your team's tasks with checklists
The Tasks tab count includes tasks assigned to any team member, not just you. For everything else on tasks, see Tasks.
Check the date chips above the orders table; you might be looking at tomorrow or a different day. Click Today to return, or All Dates to see everything. Also check the filter icon — if it shows a badge, you have active filters that might be hiding orders.
What do the coloured badges mean?
Each order has a coloured status badge that changes as the order progresses. Unconfirmed orders are highlighted differently from confirmed ones, and fulfilled orders are visually distinct so you can tell at a glance what stage everything is at.
How often does the dashboard update?
Order counts, alerts, and unconfirmed orders refresh automatically every 20 seconds. The dashboard also updates immediately when you take an action (confirming, printing, changing status). You don’t need to manually refresh.
Can I see orders for a specific date?
Yes. Click Other above the orders table to open a calendar. Pick any date or browse by month; each date shows how many orders are scheduled. All Dates shows everything at once.
Can different staff see different things?
Yes. Each team member can set their own filters (like Assigned To: Me) to see only their work. Filters are personal and don’t affect other users.
Does the dashboard work on a tablet?
Yes. It’s designed to work on tablets and iPads, which is handy for checking orders on the shop floor. For on-the-go use, the Digital Florists App is even better.
Can I leave the dashboard open all day?
Yes. Counts refresh every 20 seconds, so the dashboard stays current without any input. Many shops keep a screen with the dashboard running throughout the day.